Correcting Drawing Errors

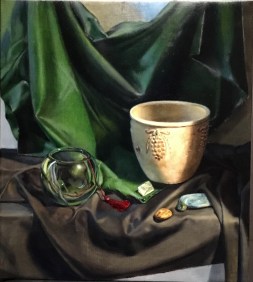
When I went back to my studio a few days later to finish my drawing, it struck me that I hadn’t draw the silver bowl large enough. Also, the two shells on the right were too big. It never stops amazing me that these mistakes are so easy to see after some time has passed, but almost impossible to detect while drawing! I was very reluctant to erase and redraw the bowl, since it had taken me a tremendous amount of time to draw all of the designs.  I did not want to do it again! It was only about a half an inch too small, so I tried to talk myself into believing that it was close enough, and wouldn’t make any difference to the composition. Tempting as that was, I realized that the bowl did need to be bigger, especially in relation to the orange box. The bowl is the focal point, and needed to look more important. The larger size would help. Also, the two shells that I’d made too large were drawing too much attention. I wanted them to be a small exclamation point at the end of the long swoop starting at the upper left. They would have to be redrawn, too!

Orange Box & Silver Bowl- drawingSilver Bowl & Orange box- corrected drawing 1

I’ve learned the hard way that you really must take the time to correct errors, even if it means a lot of additional work. If you don’t, the result will always be flawed, and it’s very difficult, if not impossible, to correct the painting later. But it did hurt to erase all of those hard-to-see and measure complex shapes!

I think I’ll put off redrawing the patterns on the bowl until after I’ve completed my black-and-white study. By then I should know if the basic shapes are correct.

Starting the Drawing for Silver Bowl & Orange Box

Orange Box & Silver Bowl- drawing

I thought that I was an old hand at understanding and drawing ellipses, but this set-up had me a bit confused. Both the lid on the orange box, and the silver bowl are set at an angle to the tabletop. I wasn’t sure how to calculate the angles. Also, there are several concentric ellipses on the lid.  I didn’t remember how to draw these correctly. I immersed myself in an old book on perspective, and I think I have it straight now. One particularly confusing point is that the actual center of an ellipse (its major axis) is not the same as it’s perspective center. In the illustration below, the perspective center of the ellispe is at c, the center of the square in perspective in which the circle is set. so the line cc marks the perspective center of the ellipse. The line ee is the actual center (or major axis) of the drawn ellipse.

Silver Bowl and Orange Box- perspecive ellipses

You need to use the perspective center as the center line of any concentric ellipses you construct.  When you do this, they appear closer together as they get further away. In the illustration below, the width of the white ring at the bottom, at 4 is wider than its width at the top.

Silver Bowl & Orange Box- concentric circles

After spending several days studying my perspective book, I realized that it wasn’t necessary for me to master all of the rules! I understand enough to draw what I need to draw. However, it is nice to know that I can refer to my book if I need it.

The pattern on the silver bowl was also confusing to draw. All of the irregular swirls had to be shown in perspective and getting smaller and narrower as they recede into the distance.

Orange Box & Silver Bowl-drawing

It took a lot of staring and measuring! Sometimes when I’m drawing such a complex object with many repeating patterns like the swirling bowl designs, I put a small piece of tape on the object to give my eye a reference point. I mark this point on my drawing, too (the small ‘x’ on the bottom center design). When my eye flits back and forth between the set-up and my drawing, the tape gives my eye a ‘landing point’ so I can know which lobe I was studying. Otherwise, by the time I’ve looked at the drawing and back again to the set-up, I’ve lost track of which lobe I was drawing.

I decided to stop here, and look at the drawing again in a few days. Then, hopefully, all of my errors will be more apparent!

Final (?) Corrections

I’ve completed the corrections I wrote about in my last post.

Green Cloth- final corrections 2

First, I darkened the green cloth in the upper left with a glaze, and then added more detail and highlights to the cloth in the lower portion, near the green bowl. I think that this draws the eye into the center of the painting, as I intended.

Green Cloth- Final corrections

Next, I added some more details on the tassel and string, adding a few threads, brightening some highlights, and adding some more contrast with darker glazes in the shadows. I brightened some of the light areas in the green bowl, and added brighter highlights on the black cloth near it.

Finally, I added more lights to the yellow crystal. As I was doing this, I corrected some drawing errors that I had missed, and adjusted some of the values.

Green Cloth- Yellow Crystal- final detail

I’ve found that sometimes after taking an initial stab at painting an object, it looks fine to me in the context of it’s yet-unfinished surroundings. Later, I find that even though it still looks acceptable, it isn’t as well seen and painted as it could be.

After looking at the painting with all of these changes, I thought of another possible improvement. How would it look if the entire black cloth were a shade or two darker? This might bring even more brightness and focus to the tan vase and stones. I’ve figured out a low-tech way of visualizing this sort of change. I cast a shadow onto the canvas from the light in my hallway where I lean my painting. I used my arm to cast a shadow onto the area of the black cloth. It effectively makes the area look like it has a dark glaze over it! (To simulate a lighter area, I use a narrow-beam flashlight).  I can’t decide if I like the area darker or not! I’ll live with it for a while, before I commit to the change.

Looking at ‘Green Cloth’ with a Critical Eye

Sometimes after working hard on a painting, I find that I get tunnel-vision and can’t judge the work clearly, so I put ‘Green Cloth’ away for a few weeks so that I could see it with fresh eyes.

Green Cloth-Before setting aside

The first thing that struck me was that the tan vase was the focal point, not the green bowl, as I’d originally thought. That seems obvious now, as it’s the brightest object with the most value contrast surrounding it. I still want to bring some more focus to the green bowl, though, to balance the pot. I’ll experiment with adding some more darks and lights in the bowl to create contrast to draw the eye. I also noticed that the red tassel and cord weren’t getting enough attention. I’ll add some more details- some highlighted strings and a few brighter highlights.

Sometimes after I’ve painted something as faithfully as I can, I stand back and see that I have to make some changes for the sake of the composition. Since my spotlight is on the right, the black cloth is brighter on the right. Though I painted this correctly, I ‘d like to bring more focus to the left side of the painting near the green bowl. I thought I’d brighten the highlights on the black cloth near the bowl to bring some attention there.

Green Cloth-Before setting aside

I think that the fold of green cloth falling down from the upper left was drawing the eye up and out of the picture. I can think of two ways to prevent this. First, I’ll darken the cloth at the top to mute the attraction. Next I’ll add some detail on the lower part of the cloth near the green bowl to keep the eye busy there.

Finally, to keep the area near my focal point interesting, I think I’ll add some brighter highlights to the yellow crystal.


A New Painting

I’ve put my Green Cloth painting away for a few weeks, so that I can judge it with fresh eyes. My thoughts have turned to a new painting!

I have three set-up stations in my studio. I thought I’d use one on the opposite side of the room from the last one I used, on a narrow shelf. Now, my spotlight is on the left, and my window is on the right. I like how the spotlight casts shadows of the vertical sides of the shelf unit onto the ‘stage.’ I selected some things from my prop cupboard that attracted my eye- an orange lidded cardboard box, a tall black vase, a silver bowl, and some shells and stones. I decided not to use a cloth, as my last painting was so cloth-centered.

I set this up very quickly- a rare occurrence for me!

Silver Bowl- Set-up

I like how every object is influencing the object adjacent to it. The orange box is casting its color onto both the black vase and the silver bowl. The silver bowl is sending wild reflections onto the box and the wall. The shell and the two stones are reflected in the bowl. The table top is sending light up onto all of the objects. Finally, cast shadows connect all of the objects into a continuous flow from upper left to bottom right. I’ll have to make sure that the small shell on the far right is highlighted enough to draw the viewer’s eye up a bit so that the viewer’s eye isn’t led right off of the canvas! I will omit the light switch in the upper right.

My focal point will be the silver bowl with the stones on it. It’s possible that the orange box will be too focus-pulling. If so, I could dull it’s color or increase the brightness of lights on the silver bowl. Or, I could make the orange box the focal point! I’ll wait and see.

Next I’ll figure out how large to make the painting, order the canvas, and start my drawing!

More on Painting From Photos

After writing my last post about why I don’t paint from photographs, I realized that I forgot to mention an important point. In my work, I show the world not as it is, but as I think  it should be. I don’t depict every detail just as it appears to me.  I’m selective about what I include and what I don’t. I omit distracting elements, add emphasis, change colors, mute details, all in the service of creating a beautiful image. If I were to work from a photo, I’d be inclined just to copy the image as it stood. A painting should be more than a photograph!

Painting From Photographs


I always paint from life- never from photographs.  I’ve noticed that many painters, especially beginners, do work from photographs. I can usually tell simply by looking at the painting that it wasn’t painted from life. Edges are hard, 3-dimensional forms are unconvincing,  colors lack subtlety, there is not enough detail in either the darks or the lights, and there is little sense of light flowing through the work. Why should this be? Doesn’t a photo show us just what reality looks like?

The answer is, no! The camera does not reliably show us what the world looks like. How many times have you seen something beautiful or striking, and photographed it only to see a disappointing result? The camera can reproduce only a limited range of values and colors. If the light is too bright, the darks are completely washed out. If there’s not enough light, the camera registers only dark with no details. Looking at a photograph, it is impossible to truly study forms and light flowing around them.

Another problem with painting from photos is that a photo captures the view from just one point. It might happen that from this one point, an object’s shape is confusing. It’s true form may not be visible. The resulting painting would be unconvincing, as the artist is obliged to guess at the true form.  If the artist were working from life, however, he would merely have to move his head a little to be able to see the shape clearly, and paint it as it really is.

Finally, using a photo puts an artist a step removed from reality. I can’t imagine studying my set-ups and painting without being completely immersed in what’s before me. If I used a photograph, I’d be painting the 2-D photograph, not the world.  I want my work to show what I see, in an immediate, visceral way.

I do use a camera in my work, but not at the painting stage. When I am composing a painting, I use my camera to record the potential set-ups so that I can judge how they will look as 2-D compositions.


The Big Picture

Now that I’ve worked on all parts of the painting, I thought I’d take a look at my composition to see how it was holding together. First I’ll compare it to my black-and-white study to see if the values are what I had envisioned at the beginning.

green-cloth-bw-study-high-contrast       green-cloth-full-size-mid-point

They’re pretty close. There are several areas in the painting that are lighter in value than in the study- the lighter portions of the green cloth, the black cloth, and the left side of the terra cotta pot. I have to decide if I like this or not. I usually end up following my original plan, but sometimes I make changes. The differences are usually the result of the light being different on a painting day than on the day I painted the study. This accounts for the lightness on the left side of the pot. The study shows it on a cloudy day, and the painting shows it on a sunny day, with more light coming in through my window shades. I’ll have to decide if it’s confusing to have the ‘shadow’ side of the pot be so light. It probably is! My usual policy is to imitate reality as closely as I possibly can while I’m in a painting session. When I’m painting I’m a copying machine, and I’m not engaging the critical side of my mind. After a session (maybe later that evening, after I ‘ve had some time away), as I’m studying what I’ve done, I can decide if reality is fighting with my composition. A good composition is more important than being accurate! Of course, any deviations I make have to be believable in the context of the work.

green-cloth-full-size-mid-point

Next I have to decide if the green cloth is too light. I’ve been avoiding glazing it darker because I liked the intense green color so much. Once I darkened it I couldn’t undo it! I thought I’d wait to see how it looked in the context of the almost-finished painting. It definitely calls attention to itself, which I think I like. It’s taken on the quality of being an object of interest in the painting, not just the background. I might want to darken it a bit near the top, so it doesn’t draw the eye away from the center of interest. I also notice that it needs some more detail in the area above the glass bowl. It looks too smooth and flat. I’ll need to go back and observe the subtleties of the folds in that area.

I think that the shadows on the right side of the painting could be darkened for added drama. Again, on a sunny day, there is a lot of light bouncing around within the set-up. I find this fascinating to observe and to paint, but it might not be contributing to the final effect that I want.

green-cloth-black-cloth

I think I like the value of the black cloth even if it’s not as dark as I originally envisioned it. I like the nuances of the warm lights, the bluish reflected lights from the window on the left, and the dark cool shadows.

I’ll make a few changes at my next session and see if the composition improves.


I consciously decided to make the green cloth lighter, as I was enjoying the brilliant green in the light areas. The left side of the pot appears much brighter and lighter on sunny days

Scumbling and Glazing

Now that the local colors and forms are in place, I can begin to deepen the shadows with dark glazes and lighten the light areas with scumbles.  Here I’ll show you the process with the green cloth.  For the cool shadows cast by my warm light, I mix ultramarine blue with a little raw umber and alizarin crimson. I mix a bit of glaze medium into my mixture, which makes it more transparent and liquid. I apply the glaze with a soft sable brush, feathering out the edges. I wipe and blot the excess glaze off of the painting with a cotton pad, leaving a transparent layer. Often this first layer isn’t dark enough. That’s fine. I can always let it dry and add another layer. I actually prefer to do this, as it’s easy to add more, but impossible to take away. Also, I find that many layers add interest, as the glazes are always slightly different and you can see one through another. You can see in the bottom of the image how the underlayer of green shows in places through the dark glaze. This gives the look of a luminous shadow.

green-cloth-green-cloth

For the light areas, I add scumbles, which are dryish coatings of thick, opaque, light colored paint, lightly dragged over the dried underlayer, usually with the flat side of a stiffer, ox-hair brush. The paint catches only on the top fibers of the canvas, resulting in a  a speckly, pebbled surface, that beautifully mimics the look of light bouncing off of the fabric. Scumbled colors always have a cool quality, so for a warm light, as on the right, I have to use a much yellower paint than you would first imagine. The scumbles on the left side are depicting cool light coming in through the window, so the coolish bluel color looks fine there.

Terra Cotta Pot and Stones

.green-cloth-terra-cotta-pot-1

Here’s my first attempt at painting the terra cotta pot and stones. My goal was to show the very basic colors and shapes without trying to be too precise. I’ve left the dark areas lighter, so that I can come back and glaze over them. Shadows will always look more transparent and luminous when achieved by painting a darker glaze over a lighter base and not by mixing the dark color and applying it as an opaque layer. The design on the terra cotta pot is very vague at this point. Its such a complicated design, that it was hard for me to see the details. As I explained in my last post, the details will become easier to see and paint with each session, as I slowly make corrections. I try not to worry about things looking crude. Polish will come later!

Another reason I like to paint in layers over many sessions is that it often can be difficult to work with wet paint. New brushstrokes can pick up the paint underneath and adjacent areas can smear into one another. I find it best to put down a layer of paint and let it dry for a few days. At my next session I can put down my new brushstrokes cleanly on the dried base.

green-cloth-terra-cotta-pot-2

At my next session, I started to indicate the texture and irregular color on the terra cotta pot. I soften the top edge to show that it’s actually a rounded form. Also, the light hitting it seems to shine out into the dark area behind, blurring it.  I begin to paint the patterned area in more detail, showing the shapes more clearly. I can now observe some of the highlights on the raised areas. I paint the patterned area on the right, and glaze the inside of the pot a shade darker. I also glaze some cast shadows from the stones onto the black cloth.

green-cloth-terra-cotta-pot-3

At my next session, I’ve added more dark glazes to the pot. I also added some texture and splotches of color to the pot in the shadow areas. Details will always be more vague in shadow areas, but it’s important to suggest them lightly, or the shadows won’t look convincing. I’ve glazed the darker areas of both the green and black cloth, and painted the stones more accurately. I painted the fringe on the green cloth and more details on the yellow crystal.